WooCommerce Plugin
Powered by Smart Processing Solution
This comprehensive guide will help you successfully integrate our payment gateway within your WooCommerce store.
The plugin features improved payment verification that reduces dependency on IPN notifications. Multiple verification points ensure orders are properly processed even when IPN notifications fail to arrive.
Understanding Sandbox vs. Production
Before you begin, it's important to understand:
-
Sandbox Mode: This is a test environment where you can safely try the integration without processing real payments. Use this first to ensure everything works properly.
-
Production Mode: Once testing is complete, you'll switch to this mode to process real customer payments.
Important: You will be provided with two separate accounts:
-
A Sandbox account for testing purposes
-
A Production account for processing real payments
Each environment has its own credentials and operates on a different URL:
-
Sandbox: https://www.smartprocessingsolution.biz/
-
Production: https://www.smartprocessingsolution.com/
The plugin keeps separate credentials for each environment, and the Connect button fills them in for you — one click per environment. You set up each environment once; there is no manual copying of credentials between them.
Install the Plugin
Download the plugin
Get the latest version from: https://smartprocessingsolution.com/files/documents/woocommerce-gateway-sps.zip
Install in WordPress
- Log in to your WordPress dashboard
- Go to Plugins > Add New
- Click Upload Plugin at the top of the page
- Select the downloaded ZIP file and click Install Now
Activate the plugin
- After installation completes, click Activate Plugin
- You'll be redirected to the plugins page where you should see "WooCommerce Smart Processing Solution Gateway" listed
One-Click Connect (Recommended)
The easy way
Instead of manually copying credentials, you can connect the plugin to your Smart Processing Solution account in one click. The plugin then fills in your credentials, notification URL, checkout logo and site information automatically — for each environment.
After installing the plugin:
- Go to WooCommerce > Settings > Payments and click Manage next to "Smart Processing Solution Gateway".
- Use the Mode selector to choose the environment you are configuring — Sandbox (test) or Production (live). This also selects which credential block is active.
- In the Connect panel, enter the email and password of your Smart Processing Solution account for that environment.
- Click Connect. The panel shows ✔ Connected as {your email} and the credential fields for that environment fill in automatically.
- When you are ready to go live, set Mode to Production (live) and click Connect again with your Production account login.
That's it. Your password is exchanged for secure API credentials and is never stored in WordPress. You can skip the manual "Configure Your Smart Processing Solution Account" and credential-entry steps below — they remain available if you prefer to set things up by hand.
Disconnecting (re-link a different account)
Once an environment is connected, the panel shows ✔ Connected as {your email} with a Disconnect button in place of the login form. Click Disconnect to bring the login form back so you can link a different Smart Processing Solution account — your saved credentials are kept until you reconnect, so payments keep working in the meantime.
Configure Your Smart Processing Solution Account
Optional if you used Connect
If you set up the plugin with One-Click Connect above, these steps are done for you automatically. Follow them only if you prefer to configure your Smart Processing Solution account by hand.
Step 1: Access Your Account Settings
Navigate to your Smart Processing Solution account settings:
-
Sandbox (for testing): https://www.smartprocessingsolution.biz/merchants/myaccount/settings#credentials
-
Production: https://www.smartprocessingsolution.com/merchants/myaccount/settings#credentials
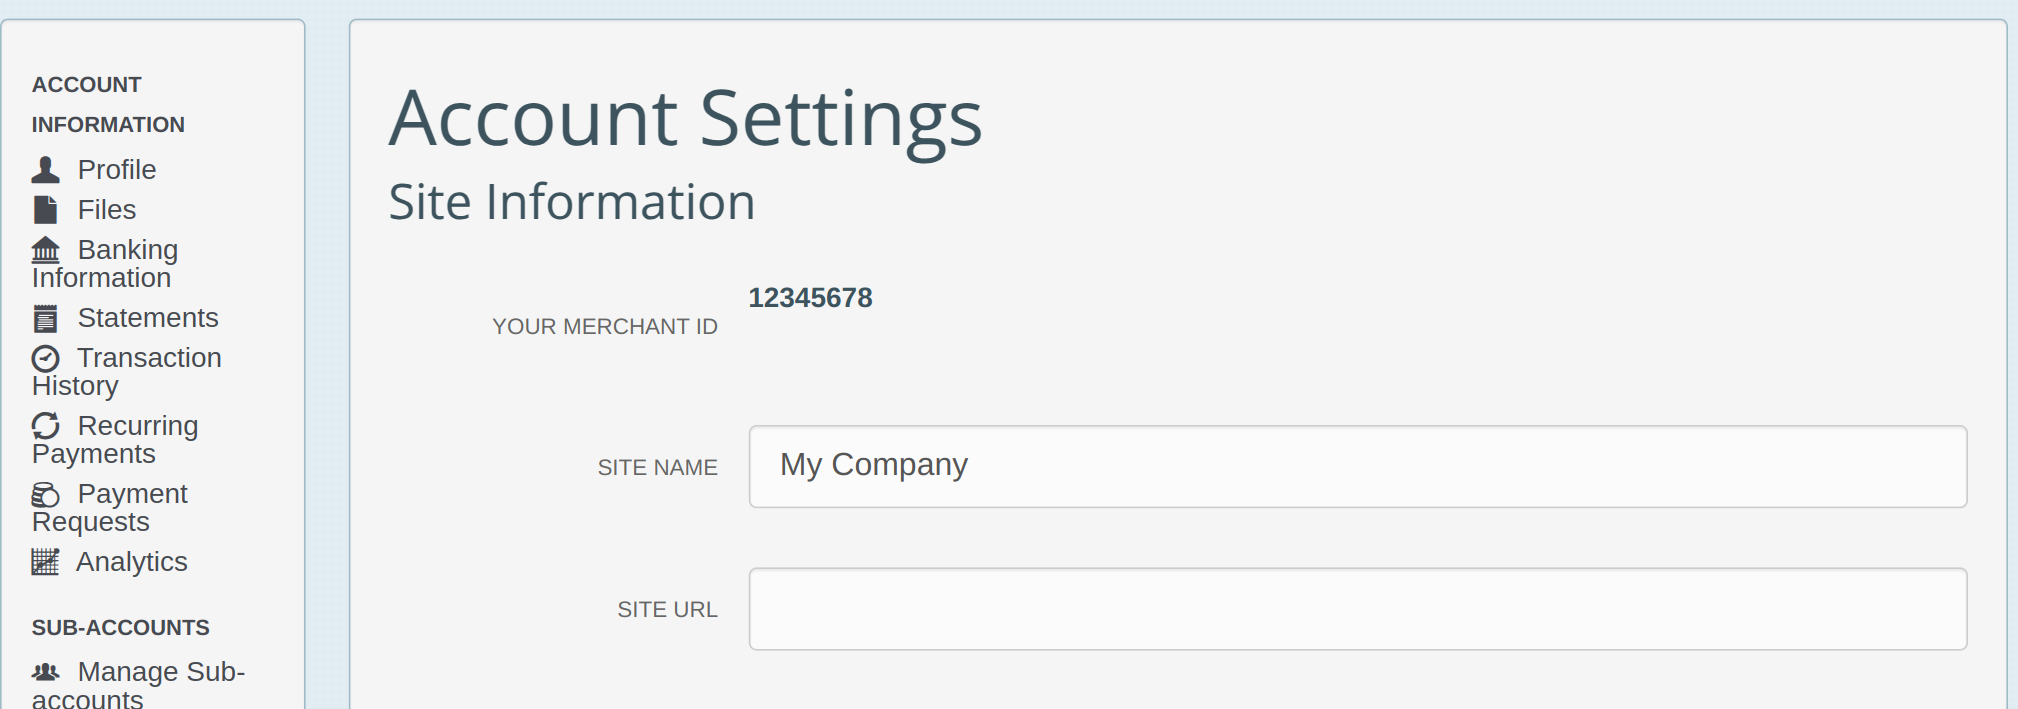
Step 2: Complete Site Information and Customer Support
All fields in the Site Information and Customer Support sections are required and must be filled in:
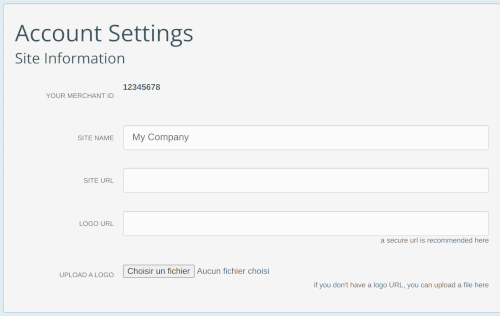
Site Information
- Site Name: Enter your company or website name
- Site URL: Enter your website's URL
- Logo URL: Optional - you can upload a logo or provide a URL to your logo
Customer Support
- Support Number: Enter a customer support phone number
- Support Email: Enter a customer support email address
- Support Message: Enter a brief message that will be shown to customers (e.g., "Call Us Any time!")
- Internal Support Message: Optional - for internal use only
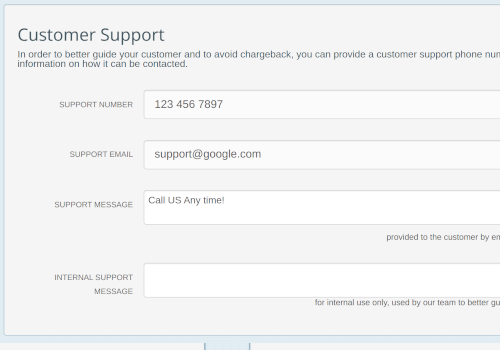
These details will be displayed to your customers during the payment process and in communications, so ensure they are accurate and professional.
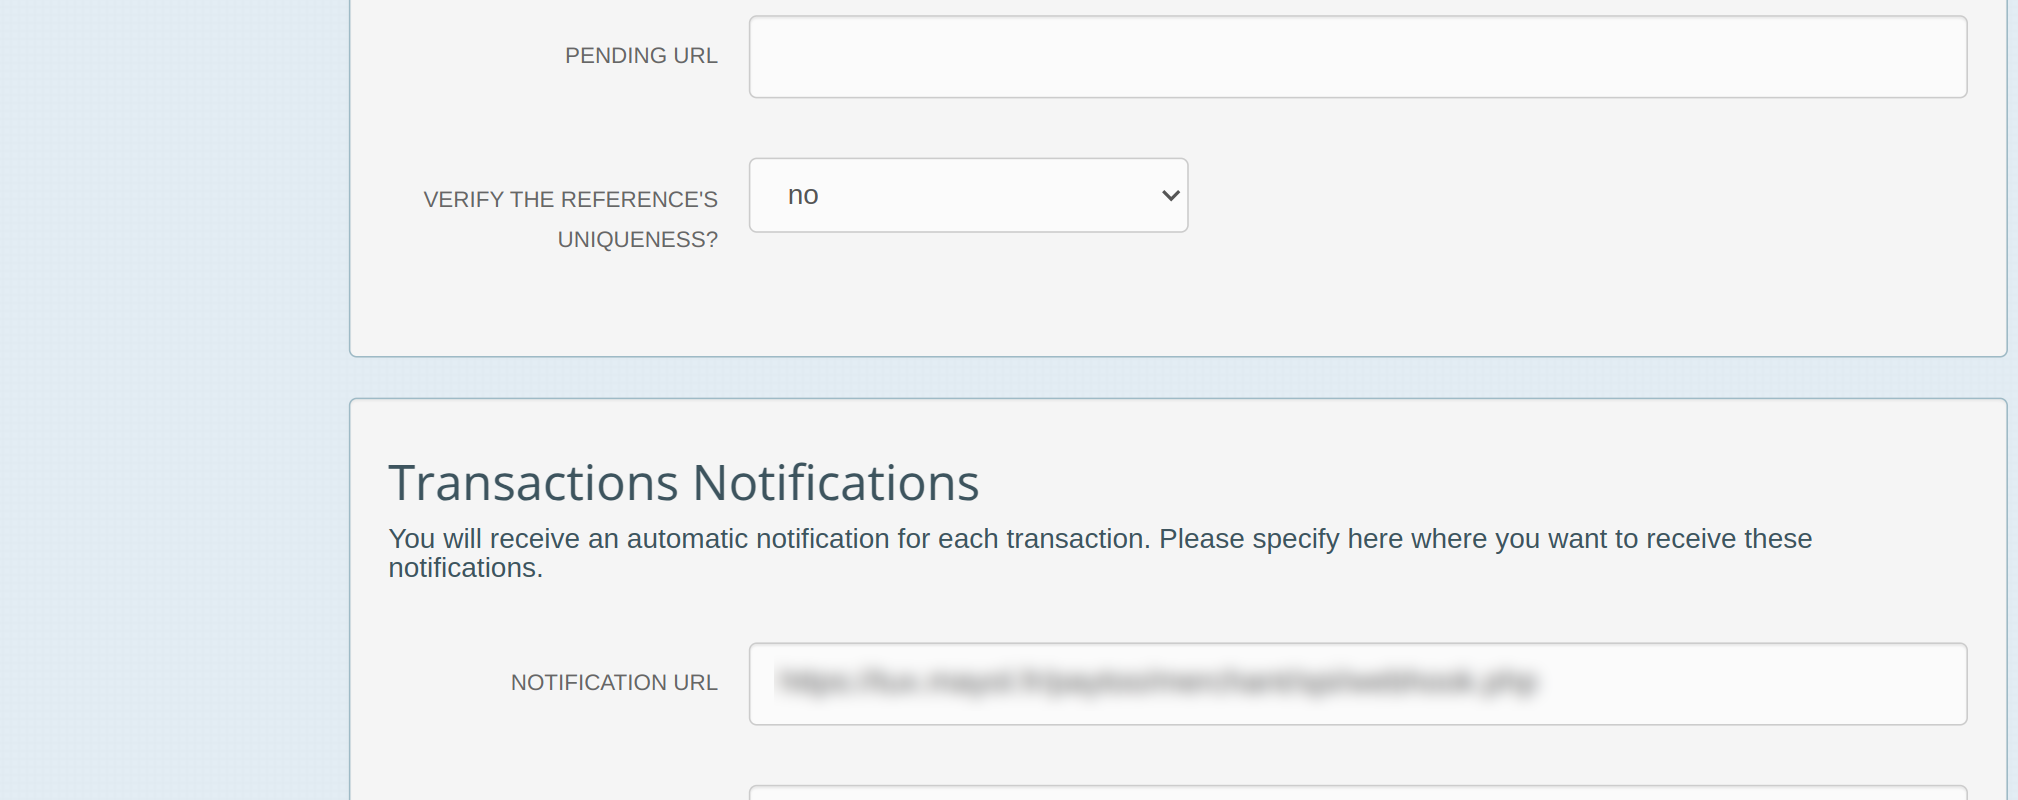
Step 3: Set Up Your Notification URL (IPN)
This is a critical step. The Notification URL allows Smart Processing Solution to automatically update your WooCommerce orders when payments are received.
Note: While IPN setup is still recommended, the plugin includes multiple fallback verification methods: - When customers return to your store, the API verifies if payment was received - If customers don't return, WordPress cron checks for payment after 5, 10, and 15 minutes - A final verification occurs before WooCommerce would mark an order as "cancelled"
These five additional verification points significantly reduce the chance of paid orders being incorrectly marked as cancelled.
Get your correct Notification URL from WooCommerce
The plugin does not have a "Notification URL" setting — there is no such field to look for in WooCommerce > Settings > Payments. The URL is derived from your store address:
- Take your store's home URL and append
/?wc-api=WC_Gateway_EasyProcess - Example: for
https://your-store-domain.comthe Notification URL ishttps://your-store-domain.com/?wc-api=WC_Gateway_EasyProcess - If your store lives in a subdirectory, keep it:
https://your-store-domain.com/shop/?wc-api=WC_Gateway_EasyProcess - The equivalent pretty-permalink form
https://your-store-domain.com/wc-api/WC_Gateway_EasyProcess/also works
Enter the Notification URL in Smart Processing Solution
Enter this URL in the "Notification URL" field under "Transaction Notifications" in your Smart Processing Solution account settings.
Verify your Notification URL
Use the plugin's built-in test: go to WooCommerce > Settings > Payments > Smart Processing Solution Gateway and, in the Security section, click Test notification reachability. Our servers try to reach the URL we have on file and tell you whether it is reachable or blocked. See Test that our servers can reach your store.
Don't test by opening the URL in your browser
Opening the notification URL in a browser only proves that you can reach it — the request
comes from your own connection, not from our servers, so it tells you nothing about whether our
notifications get through. It can also trip your firewall or bot protection and show up in your host's
logs as unexpected traffic on the wc-api path. Use the reachability test above instead.
Step 4: Credentials and Security Settings
In your Smart Processing Solution account, locate the "Credentials and security" section where you'll need to configure several important security credentials:
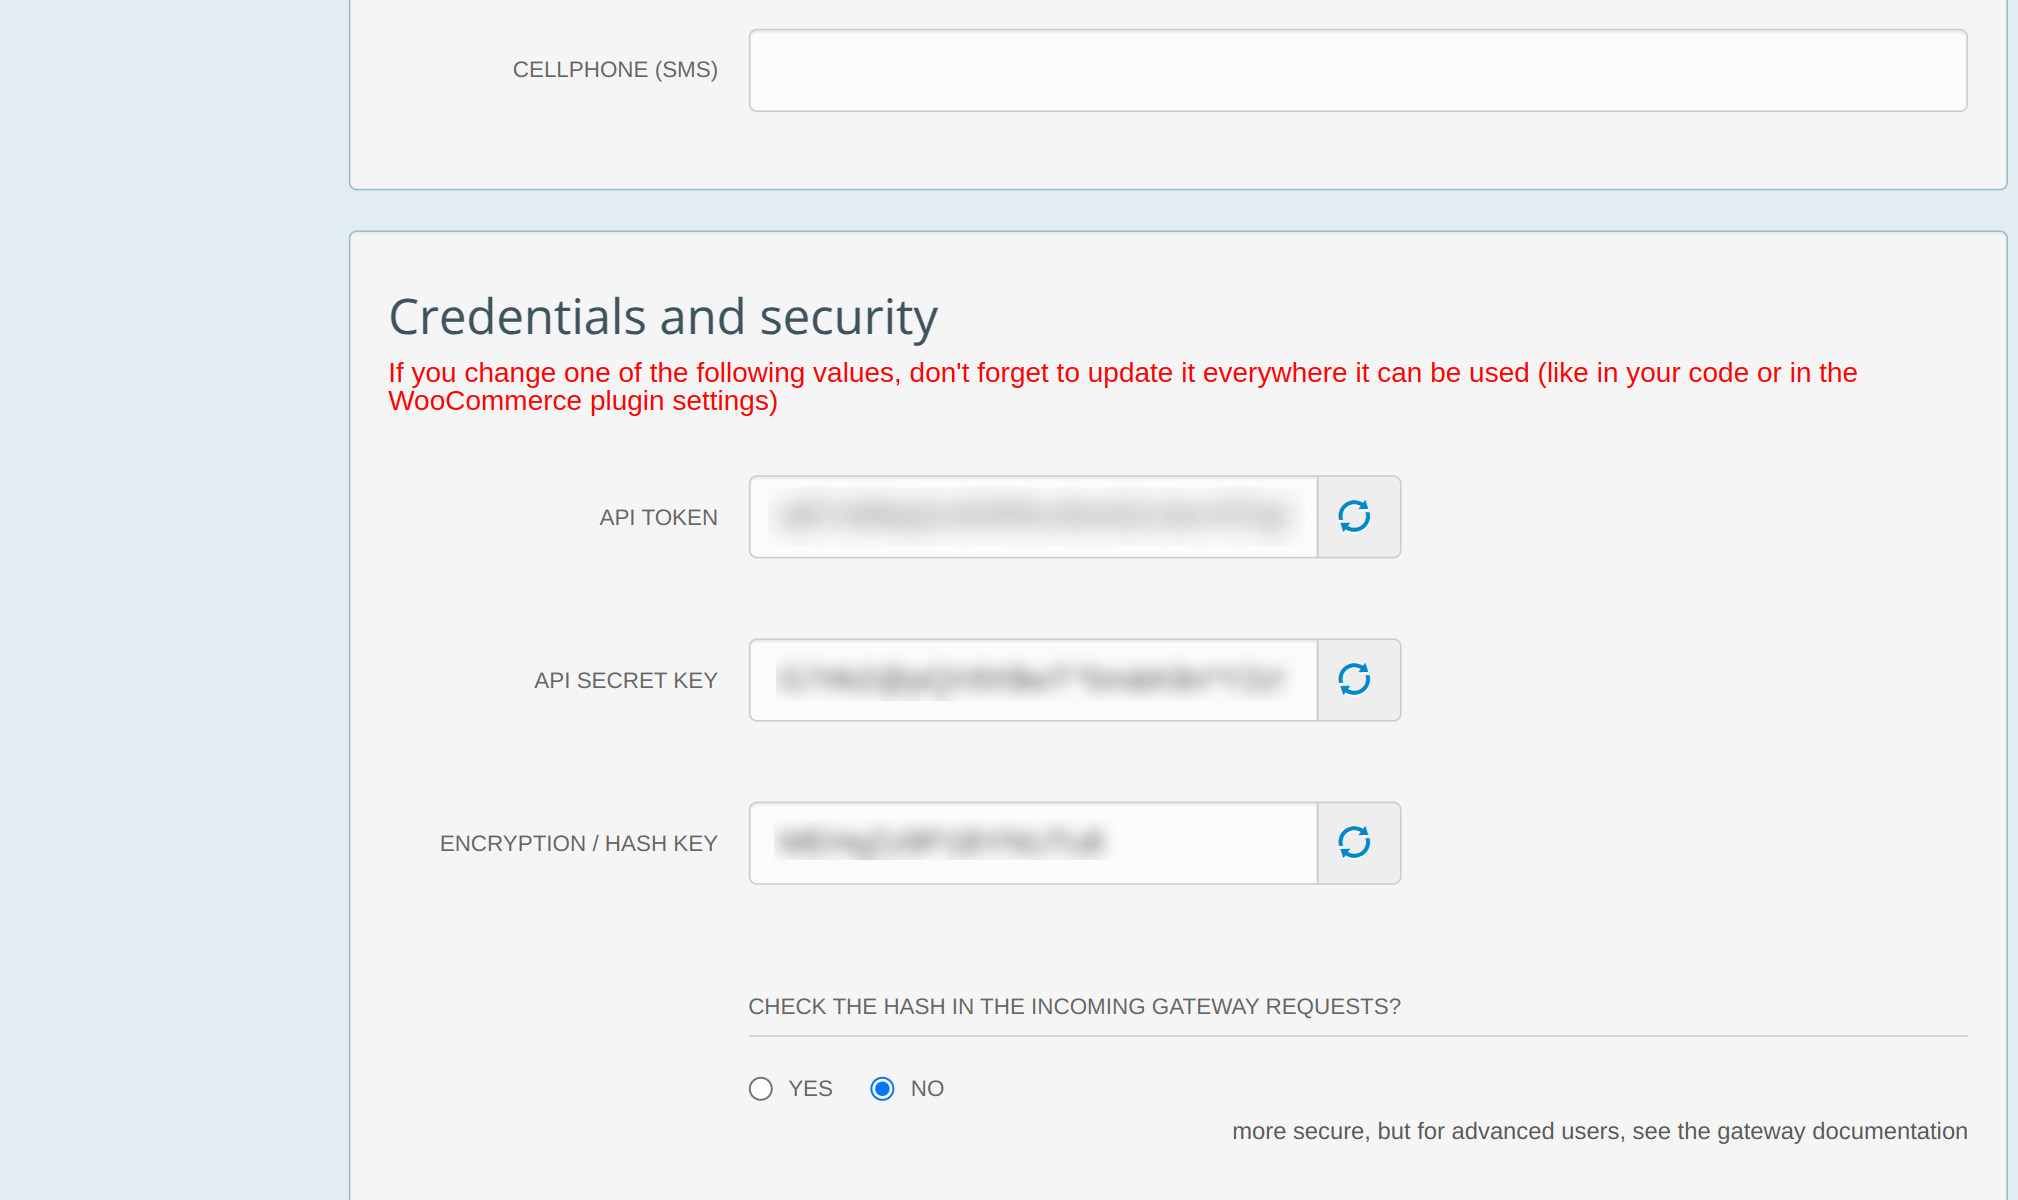
API TOKEN
- This is a unique identifier for your integration
- You can generate a secure token automatically by clicking the refresh icon (🔄) next to the field
- Keep a record of this token as you'll need it for your WooCommerce plugin configuration
- Example:
ZQ2wZvJQmvw9Obe3q4TWgtrR4Z4w75FdGoAH0uLMARPLjaa8FTPUFv2e7jUdh5Ad
API SECRET KEY
- This is a secure key used to authenticate API requests
- Click the refresh icon (🔄) to generate a strong secret key automatically
- Keep this key confidential and secure
- Example:
DATo1ot4j7RKamxs8XddAloKlgKqOky0
ENCRYPTION / HASH KEY
- Create a strong, unique hash key or use the refresh icon (🔄) to generate one automatically
- This key is used for security validation of transactions
- Use letters, numbers, and special characters for better security
- Example:
MEHqZz9P1BYNUTu8
HASH VERIFICATION SETTING
- Set "CHECK THE HASH IN THE INCOMING GATEWAY REQUESTS?" to "YES" for maximum security
- This option can be set to "NO" during initial setup or troubleshooting, but should be enabled for production use
IMPORTANT: If you change any of these values, remember to update them everywhere they are used, including your WooCommerce plugin settings and any custom code implementations.
Step 5: Save Your Smart Processing Solution Settings
After entering all your credentials and security settings, click "Update" at the bottom of the page
Step 6: Note Your Merchant ID
Before leaving your Smart Processing Solution account: 1. Locate your 8-digit Merchant ID at the top of the Account Settings page (shown as "YOUR MERCHANT ID" in the interface) 2. Write this down as you'll need it when configuring the plugin.
Configure the Plugin
Access the plugin settings
- Go to WooCommerce > Settings > Payments
- Click Manage next to "Smart Processing Solution Gateway"
Configure the settings
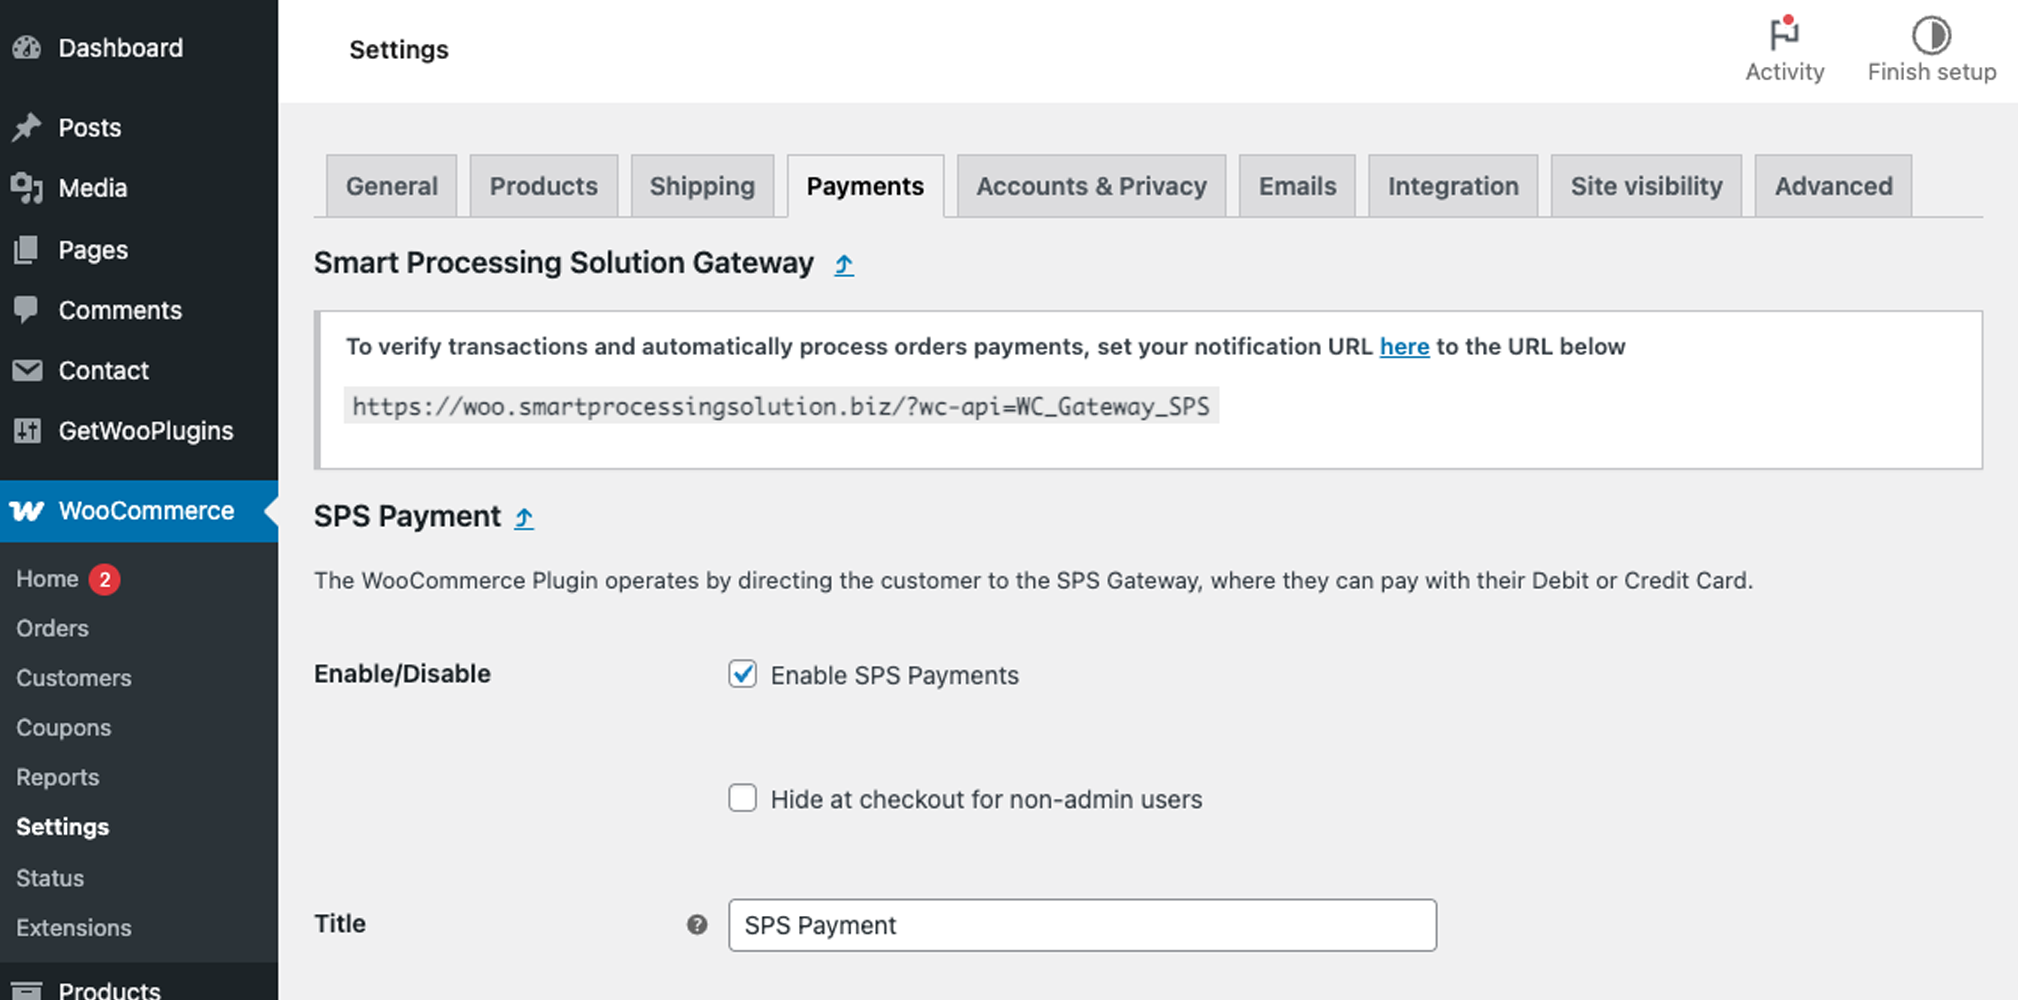
Basic Settings
- Enable/Disable: Check "Enable Smart Processing Solution Payments" to activate the payment method
- Title: What customers will see at checkout (default: "Credit Card Payment")
- Description: Additional information shown to customers (example: "Pay securely by debit/credit cards")
- Hide at checkout for non-admin users: Enable this if you want to hide this payment method from regular customers (useful during testing)
- Logo height (section "Checkout appearance", plugin 1.3.0 or later): The height, in pixels, of the payment method logo shown at checkout. Your theme normally decides this size, which often makes the logo too small or too large. Enter a height, the width follows automatically. Leave the field empty to keep your theme's default
Environment Settings
- Connect: The one-click panel (see One-Click Connect) that fills in the credentials for the active environment.
- Mode: A selector — Sandbox (test) or Production (live) — that chooses which environment processes payments and, at the same time, which set of credentials (Sandbox or Production) is active.
- Sandbox URL: The gateway URL for the test environment (default: https://www.smartprocessingsolution.biz)
- Production URL: The gateway URL for live payments (default: https://www.smartprocessingsolution.com)
- Sub-account: Optional. A dropdown of your sub-accounts for the active environment (Sandbox and Production have separate IDs), with a Create a sub-account for this store button. See Managing Sub-Accounts.
Security Credentials (per environment)
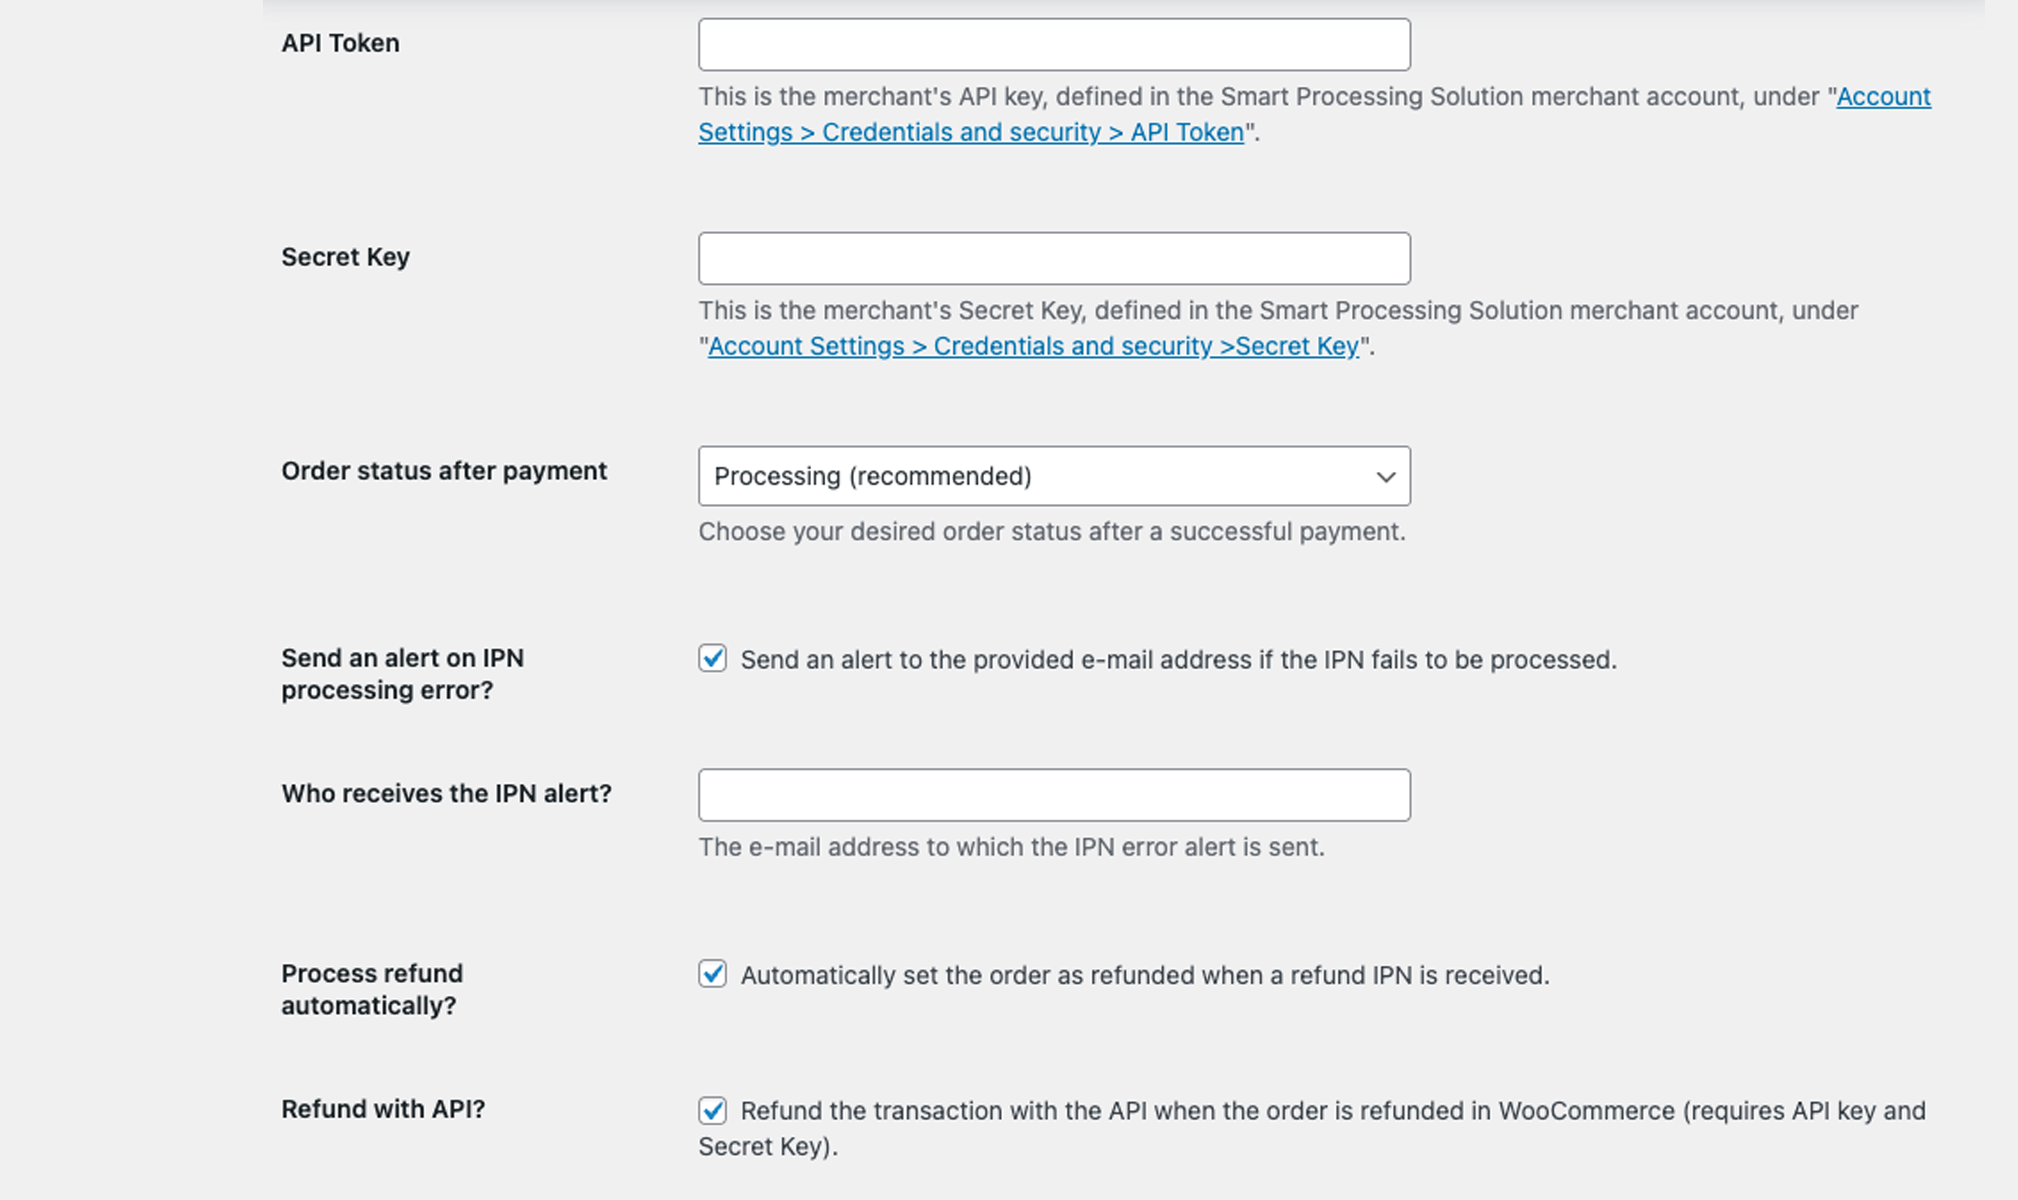
The credentials are grouped into two blocks — Sandbox credentials and Production credentials — and the Mode selector chooses which block is used. Each block contains:
- Merchant ID: Your 8-digit Merchant ID for that environment
- Encryption / Hash Key: The hash key for that environment
- API Token: The API Token for that environment
- Secret Key: The Secret Key for that environment
The fastest way to fill a block is the Connect button (see One-Click Connect). You can also enter the values by hand from your Smart Processing Solution account's "Credentials and security" section for that environment.
Customer Support (required)
Required for payments to work
The gateway will not process a payment until a support email and message are set. Set them here and you don't need to open your Smart Processing Solution account.
The Customer Support section (below the Sub-account field, one per environment) lets you set what your customers see on the payment page:
- Phone number — optional
- Email — required
- Message to customer — required
The fields load your current Smart Processing Solution values automatically (use ↻ Refresh to reload); click Update to save them back to your Smart Processing Solution account for the active environment.
The editor follows the Sub-account field above it. With — None — selected it edits your account default support info (email and message required — the gateway will not process a payment until both are set). When you select a sub-account, the editor switches to that sub-account's own support phone/email/message (pre-filled from the account default when empty; here the email is required but the message is optional — a blank message falls back to your account default on the payment page). This lets each store under the same account show its own support details.
Order & Notification Settings
- Order status after payment: Choose what status successful orders should have (recommended: "Processing")
- Send an alert on IPN processing error: Enable to receive email alerts if payment notifications fail
- Who receives the IPN alert: Email address for receiving alerts
- Process refund automatically: Enable to automatically update order status when refunds are processed
- Refund with API: Enable to process refunds through the API
Plugin Settings
- Verbose logging: Enable for detailed transaction logs (helpful for troubleshooting)
- Auto-Update: Enable automatic plugin updates (the plugin checks every 6 hours and installs updates with automatic backups). On by default.
Security
- Validate IPN IP: Verifies that IPN notifications come from authorized server IP addresses. OFF by default — stores behind Cloudflare or another proxy/CDN receive IPNs from a proxy IP that fails this check, so enable it only if your store is not behind a proxy/CDN.
- Validate IPN Signature: Additional security validation that verifies a hash signature on IPN notifications. On by default.
Save your settings
Save your settings by clicking Save changes at the bottom of the page
Enhanced Payment Verification
The plugin implements a robust payment verification system that significantly reduces dependency on IPN notifications:
- Primary Method: IPN (Instant Payment Notification)
-
When properly configured, this remains the fastest way to update order status
-
Fallback Methods (automatically activated if IPN fails):
- Customer Return Verification: When customers return to your shop (which happens automatically), the API verifies if payment was received
- Scheduled Verifications: If the customer doesn't return, WordPress cron checks for
payment after:
- 5 minutes
- 10 minutes
- 15 minutes
- Pre-Cancellation Check: Before WooCommerce changes an unpaid order to "cancelled," a final verification is made with the API
This multi-layered approach ensures that orders paid by customers are properly marked as such, even if there are issues with the IPN system.
Important: These enhanced verification methods only work if your API credentials (API Token and Secret Key) are correctly configured in both your merchant account and WooCommerce plugin settings. Ensure these credentials match exactly in both systems.
Managing Sub-Accounts
Run several stores under one account
Sub-accounts let you run several stores under a single Smart Processing Solution account. Each store gets its own name, logo and customer-support details on the payment page and receipts, receives its own payment notifications, and is reported separately.
What are sub-accounts?
If you operate two or more WooCommerce stores under the same Smart Processing Solution merchant account, create a sub-account for each store (including your original one). All sub-accounts share the same credentials — the sub-account only tags and routes each store's transactions, giving you:
- Correct branding (name and logo) per store on the payment page and emails
- Each store receives its payment notifications (IPN) at its own URL
- Clean per-store reporting in your Smart Processing Solution dashboard
Enable the feature first
Sub-accounts must be enabled on your merchant account by the Smart Processing Solution team. If the Sub-account dropdown says they are not enabled, contact [email protected].
Sandbox and Production are separate
Sub-account IDs are different in Sandbox and Production. The plugin keeps a separate sub-account per environment, so set it on each environment (switch with the Mode selector).
Set up a sub-account for your store
In the plugin settings (WooCommerce > Settings > Payments, then Manage next to "Smart Processing Solution Gateway"), the Sub-account field is a dropdown of your Smart Processing Solution sub-accounts for the active environment.
- Pick the environment you are configuring with the Mode selector.
- Make sure that environment is connected — the dropdown is filled from your Smart Processing Solution account using that environment's credentials.
- Either select an existing sub-account, or click Create a sub-account for this store.
- Click Save changes.
The one-click shortcut
Create a sub-account for this store creates the sub-account in Smart Processing Solution for you — pre-filled with this store's name, URL, notification (webhook) URL and logo — then selects it. Running it twice is safe: it reuses the store's existing sub-account instead of creating a duplicate. Use ↻ Refresh if you created one directly in your dashboard and want it to appear in the list.
Repeat on the Production environment with that store's production sub-account when you go live. You can still create and edit sub-accounts by hand in your dashboard: Production / Sandbox.
Cloudflare and Bot Protection Services
Important
If your store uses Cloudflare, Sucuri, Wordfence, or any similar bot protection / WAF service, payment notifications (IPN) from our servers may be blocked or received with an incorrect IP address. This will cause orders to remain in "Pending" status even after the customer has paid.
Allow our notifications through
The most reliable rule is based on the IPN endpoint path, not on our IP addresses. In Cloudflare, create a WAF custom rule:
- Go to Security > WAF > Custom Rules
- Create a rule that skips all security checks when the URI path contains
wc-api
This is safe: the notifications we send to that path are validated by signature, which is a stronger check than the source IP (see Disable IP Validation below).
If you prefer to match on our IP addresses
You can additionally restrict the rule to the addresses our servers send notifications from:
| Server | Environment | IP Address |
|---|---|---|
| FC1 | Production | 18.205.86.169 |
| FC2 | Production | 3.221.82.4 |
| ID1 | Production | 54.225.180.167 |
| ID2 | Sandbox | 34.237.159.110 |
Allow both the Production and the Sandbox addresses, so switching the plugin's Mode does not break your notifications.
An IP rule can silently fail
A rule that matches only these IPv4 addresses will not match a connection that reaches your store over IPv6 — the rule simply doesn't apply and your security service blocks the request. If your store or your CDN answers on IPv6, prefer the path-based rule above. The list shown by the plugin's Test notification reachability button is always the authoritative, up-to-date one.
Disable IP Validation
When a proxy like Cloudflare sits between our servers and your store, the IP address seen by WordPress is Cloudflare's IP, not ours. This causes the plugin's IP validation check to fail.
To avoid this issue, go to WooCommerce > Settings > Payments > Smart Processing Solution Gateway and uncheck the "Validate IPN IP" option.
You can safely disable this setting as long as "Validate IPN Signature" remains enabled — the signature check provides stronger security than IP validation and works correctly regardless of proxy configuration.
Test that our servers can reach your store
Rather than wait for stuck orders, you can check this directly. Go to WooCommerce > Settings > Payments > Smart Processing Solution Gateway and, in the Security section, click Test notification reachability. Our servers immediately try to reach your store's notification URL and report whether they are reachable or blocked — and, when blocked, show the exact IP addresses to allow (the authoritative, up-to-date list). This also runs automatically once right after you connect an environment, so a firewall problem is caught during setup instead of after dozens of orders.
Seeing a Cloudflare "Ray ID" error?
If a plugin action (Connect, sub-accounts, …) instead reports that your server was blocked by Cloudflare with a Ray ID, that is the opposite direction — our security service is blocking your store's outbound calls to us. Send that Ray ID and your server IP (both shown in the message) to support so we can allow your server.
Testing Your Integration
Before accepting real payments, test your setup using the Sandbox mode:
Sandbox test card — use these details
In Sandbox (test) mode, pay with this card. A real card does not work in Sandbox.
| Card Number | 4444 3333 2222 1111 |
| Expiry Date | 12/30 |
| CVV | 235 |
Configure for testing
Ensure your plugin is configured with: - Mode: Sandbox (test) - Your Sandbox credentials filled in — via the Connect button or entered manually
Place a test order
Place a test order on your store and proceed to checkout
Use test card details
- Card Number:
4444 3333 2222 1111 - Expiry Date:
12/30 - CVV:
235
Verify the process
Complete the purchase and verify: - The order is created in WooCommerce - The order status updates correctly - Check the order notes to confirm transaction details
Switch to production
When ready for production: - Set Mode to Production (live) - Click Connect again with your Production Smart Processing Solution login (or enter your Production Merchant ID and security credentials manually)
Upgrading the Plugin
Since this plugin is not published on the WordPress Plugin Directory, upgrades must be performed manually. Here's how to upgrade when a new version becomes available:
When a New Version is Released
Notification
You will see a notice in your WordPress admin dashboard informing you that a new version is available. This notice will include a link to download the latest version.
Download
Click the provided link to download the new ZIP file of the plugin.
Upgrade Process
Install the new version
- Go to Plugins > Add New
- Click Upload Plugin at the top of the page
- Select the newly downloaded ZIP file and click Install Now
- When prompted that the plugin already exists, click Replace current with uploaded
Verify the upgrade
- Confirm that the plugin version number has been updated
- Your previous settings will be preserved automatically
After Upgrading
- Verify that the plugin is functioning correctly by testing a transaction
- Check the plugin settings to ensure everything is configured as expected
Note: If you encounter any issues after upgrading, please contact our support team at [email protected].
Troubleshooting
Common Issues and Solutions
Payment not processing or orders not updating automatically
- Verify your Notification URL is correctly set in Smart Processing Solution
- Test the Notification URL in your browser (should show a json response)
- Check that your security credentials match exactly between Smart Processing Solution and the plugin
Test payments failing
- Make sure that you use the test card
4444 3333 2222 1111, expiry12/30, CVV235(see Sandbox test card) - Verify Mode is set to Sandbox (test)
- Ensure your Sandbox Merchant ID and security credentials are entered correctly
Production payments failing
- Confirm Mode is set to Production (live)
- Verify you've entered your production Merchant ID and security credentials
- Check that your Notification URL is accessible from the internet
Support
If you continue to experience issues, please contact our support team at [email protected] with the following information:
- Your website URL
- Your Merchant ID
- A description of the issue
- Any error messages you're receiving